Showing posts with label Handmade Card. Show all posts

Sunday, July 24, 2016

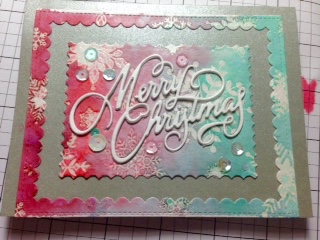
Embossed Resist Christmas Card

Another Embossed Resist Technique this time for a Christmas Card.  I started with a panel of watercolor paper and embossed various snowflakes as a background.  I then watercolored the panel using red and green distress inks.  Once the inks dried I used a hot iron to remove the shine from the embossed snowflakes.  I then used scalloped dies from Pretty Pink Posh and placed two of the cut outs onto silver card stock.  Added some PPP sequins and below is the finished card.

Watercolored Frame Christmas Card

Saturday, July 23, 2016

Altenew Academy Background Stamping

I am trying to mix it up a little by taking more classes from different venders.  Todays card was created with a technique learned in Altenew Academy; flower stamped background.  The same flower image is stamped using a light ink on upper part of stamp and darker ink on the bottom.  It adds dimension and creates shadows.  Once the flowers were stamped, leaves were added using the same light/dark ink application.  All that was left to do was add the "happy birthday sentiment," and some Pretty Pink Posh sequins.  Overall I was happy with the results and can't wait to send it to the next person on my birthday list.  Thanks for stopping.  All comments are welcome and appreciated.

Background Stamped with Flowers

Tuesday, July 19, 2016

On-Line Card Class: Heat Wave Day 3

I am so thrilled with what I learned day 3 of class.  We learned embossed resist technique.  I started with watercolor paper, pounced it with my powder bag, used a tiny star background stamp with VersaMark ink, sprinkled it with clear embossing powder, set it with a heat gun and bam there were clear stars all over the watercolor paper! Next I spread water over the entire card and used distress inks watered down with "Shimmer Spitz."  I then dried it completely, placed a piece of clean typing paper on top and went of it with a hot iron.  I lifted the typing paper and most of the embossing adhered to it.  I repeated this step until all of the embossing was gone.  Now I had watercolored panel with little stars where the embossing was.  Next I added the sentiment, Happy Birthday, using VersaMark black onyx ink and was able to repeat accurately with my Misti twice.  Again, I let it dry, testing with embossing powder to see if it stuck, and the sentiment was completely covered with powder (I used a brush to sweep it off), it took several tries before it did not stick.  Using my Misti and a cleaned off sentiment stamp, I off-set the stamp slightly to the left and below the black stamped sentiment.  Using white detail embossing powder and heat setting it, the sentiment revealed a shadow and I love the effect.  Below is the finished card front.

Embossed Resist Technique

Monday, July 18, 2016

On-Line Card Class: Heat Wave Day 2 Part 2


I am learning so much from this class.  Today I am going for the plaid look using embossing and stripes.  It took awhile to get into the groove of switching directions, pouncing before using VersaMark and trying to stamp a straight line (in the correct order).  Yikes, I'll only show you the last ones because I threw my horrible, miss-combobulated messes away!

Plaid Happy Birthday
Plaid Christmas Ca

Thursday, July 14, 2016

On-Line Card Class Heat Wave: Day 2

Wow, love this class on embossing techniques!  I am also getting a head start on my Christmas Cards by trying the techniques with them.  I really like all the shimmer and shine on the cards.  In Day 2 we learned how to add details on our cards with embossing, it really makes a wonderful difference!  Below are just two of the cards I made following Jennifer McGuire's class video.  I will be adding more as I continue with Day 2 and 3 with more examples and my own spin on the techniques.  As always thanks for stopping by.

Adding Details with Embossing
Ornament Christmas Card


Ornament Christmas Card showing some of the Sparkle


Thursday, September 24, 2015

Watercolor Day 2

Today's class consisted of making backgrounds with various types of watercolor mediums.  I made my background using Peerless Papers and then spraying with Perfect Pearls.  I love the autumn look that was created.  It matched My Favorite Things Harvest Mouse Set for an autumn hello card.

Thank you for stopping by and visiting my little blog.

Saturday, September 27, 2014

Day Off from On Line Class; Time for Christmas Cards

The weekend is here so I thought I would take a break from class and make a Christmas Card for OWH.  I can't believe they are due by Oct. 10th.  I won't be sending too many to them this year; they need fewer cards because of the draw down.  The card I made with a new Paper Smooches Stamp Set (A Blessed Christmas).  I love this new set.


Shiny Joy to the World
Less glare to show more details


Thursday, September 11, 2014

The Chemist in Me

When I saw this stamp on Saturated Canary I knew it was meant for me.  I worked in a laboratory for over 30 years.  It was fun to color with Copic Markers, I even discovered one named "Acid." This color was perfect for the fumes exiting the Erlenmeyer Flask.  I am thinking of coloring an 8 X 10 to frame and hang in my craft room.

Chemistry in Action
Thanks for stopping by, leave a comment, they make my day!!

Thursday, September 4, 2014

A Special Birthday

Thought I would share a birthday card I made for a special sister-in-law.  Her birthday happens to fall on 9/11 so it always brings sad memories along with it.  I like to make her a card to help make it a little more of a party day for her.  Below is the card I made her this year.

A Special Birthday Card
 Too bad the sparkle and shine didn't show up on the picture.  Hope she likes it!!